|
Thursday, 31 March 2011
April Fool's Day History
Wednesday, 30 March 2011
Concept Computer: The Beam
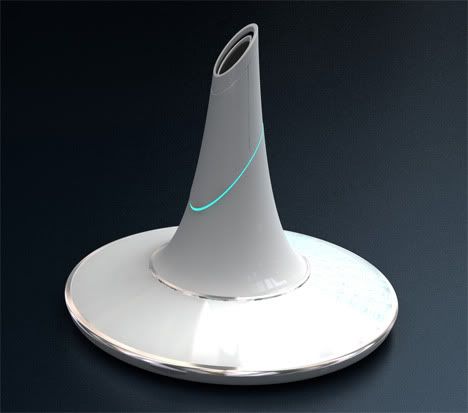
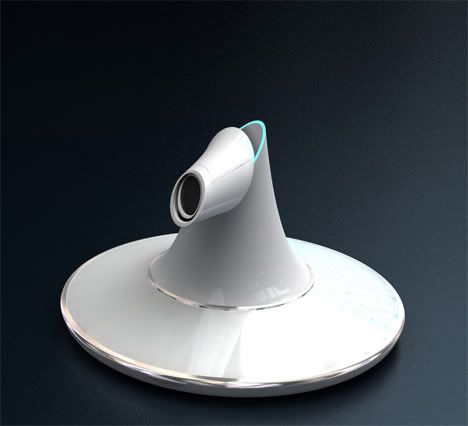

Project the Screen anywhere you want to, ans use it as your Monitor, Gives Classic style HQ interface.

Change the Mood Light in dark room, whenever you want to, or in a Mood to
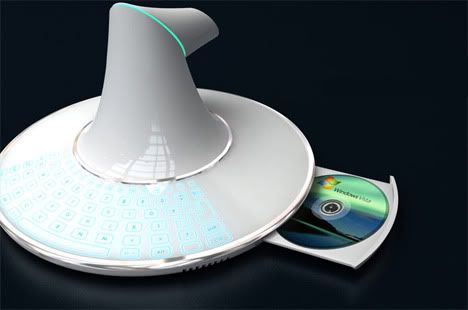
CD-Rom attached with the main body.

Apple cuts UK iPad 2 prices by 5% to £399 and up - yet will make more profit
 A customer looks at the iPad 2 Photograph: Andrew Gombert/EPA
 It's a day for tablets. First RIM announced US prices and dates, though not UK ones, for its Playbook tablet.
Now Apple has announced the price for the UK version of the iPad 2, which will work out cheaper - even after the VAT rise introduced in January - than the first version.
Prices are, including VAT:
Wi-Fi only:
16GB: £399.00 (£332.50 ex 20% VAT)
32GB: £479.00 (£399.17 ex 20% VAT)
64GB: £559.00 (£465.83 ex 20% VAT)
Wi-Fi and 3G:
16GB: £499.00 (£415.83 ex 20% VAT)
32GB: £579.00 (£482.50 ex 20% VAT)
64GB: £659.00 (£549.17 ex 20% VAT)
Those compare to prices last year respectively of £429, £499, £599, £529, £599 and £699. Calculating the differences, the retail (with VAT) price has fallen by between 4% and 7%, with the average being 5%; the ex-VAT price (the one you would normally compare against the US price) has fallen by between 5% and 9%, averaging 7.4%.
That is Apple unveiling its next weapon - price - in this battle, where everyone is using every trick that they know to get an edge.
Or is it? It turns out that what's happening is that Apple is indeed cutting prices, but doing it with the help of the exchange rate.
At the moment $1 = £0.6191; back in May 2010 (when the iPad launched in the UK and other countries) it was $1 = £0.682452 (20-day average), so the dollar has weakened against the pound (you need fewer pounds to buy a dollar now than you did). The dollar, in fact, is about 10% lower now than it was against the pound last May.
In turn, that means that $499, the iPad price in 2010 and 2011, equated in 2010 to £340.54, but is now £304.69. (In other words: it takes fewer pounds to get the $499 that Apple wants to get for each iPad sold.)
So it might seem like Apple is doing everyone an enormous favour by cutting the price (and it certainly won't hurt sales), but it is actually benefiting from the movement in exchange rates - in fact, it's going to make more profit from iPad sales this year than last year, even with a lower price.
A couple more interesting wrinkles to the iPad 2 launch internationally: sales won't start until 5pm in the evening of Friday, or 1am that day if you're ordering online. Why has it chosen such a time of day to do it? No word on that (we have called Apple but got no response), but there's the faintest possibility that it's to discourage the people who made the lives of would-be iPad buyers in the US hell - buying up loads of them in order to ship them off to the Far East. And another clue that that is the motive comes from the fact that sales in Hong Kong, Singapore and South Korea won't start for another two weeks, even while the other 25 countries (Australia, Austria, Belgium, Canada, Czech Republic, Denmark, Finland, France, Germany, Greece, Hungary, Iceland, Ireland, Italy, Luxembourg, Mexico, Netherlands, New Zealand, Norway, Poland, Portugal, Spain, Sweden, Switzerland and the UK) get theirs. (Though that won't really dissuade them - they'll just come back at the weekend, surely.)
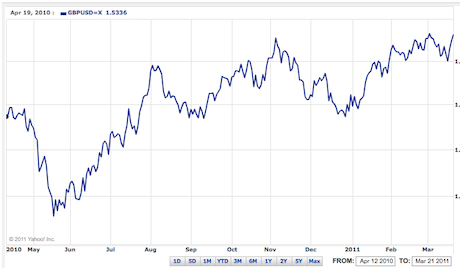 The dollar/pound exchange rate since May 2010: the pound has sttrengthened since the launch of the iPad last year, which will help Apple's bottom line even as it cuts prices And just to add to the tablet fun, at CTIA Samsung has announced (or possible re-announced) its tablets and pricing. There will be the Galaxy Tab 10.1 (guess the screen size), to be released on 8 June - running Android 3.0 ("Honeycomb"). Prices: $499 (16GB), $599 (32GB). The Galaxy 8.9 will be priced at $469 (16GB), $499 (32GB), and be released in "early summer".
So is this iPad competition? Well, Honeycomb is certainly nice, and that's price-competitive with the iPad, at least in the US. UK prices haven't been set (or suggested) and the release date is only "later this year". Samsung didn't want to share sales figures either: "those are only for internal use," we were told. (The press release and details haven't made it to Samsung's online press releases.)
The list of tablets that have been announced is thus growing ever longer, but the list of those actually seen in the wild in the UK remains extremely short - the iPad and the Samsung Galaxy Tab (and now @Dirkbruere's Advent Vega) being the principal ones. Anyone else got a tablet not in that list that they've bought in the UK this year? And what do you think of it?
Now Apple has announced the price for the UK version of the iPad 2, which will work out cheaper - even after the VAT rise introduced in January - than the first version.
Prices are, including VAT:
Wi-Fi only:
16GB: £399.00 (£332.50 ex 20% VAT)
32GB: £479.00 (£399.17 ex 20% VAT)
64GB: £559.00 (£465.83 ex 20% VAT)
Wi-Fi and 3G:
16GB: £499.00 (£415.83 ex 20% VAT)
32GB: £579.00 (£482.50 ex 20% VAT)
64GB: £659.00 (£549.17 ex 20% VAT)
Those compare to prices last year respectively of £429, £499, £599, £529, £599 and £699. Calculating the differences, the retail (with VAT) price has fallen by between 4% and 7%, with the average being 5%; the ex-VAT price (the one you would normally compare against the US price) has fallen by between 5% and 9%, averaging 7.4%.
That is Apple unveiling its next weapon - price - in this battle, where everyone is using every trick that they know to get an edge.
Or is it? It turns out that what's happening is that Apple is indeed cutting prices, but doing it with the help of the exchange rate.
At the moment $1 = £0.6191; back in May 2010 (when the iPad launched in the UK and other countries) it was $1 = £0.682452 (20-day average), so the dollar has weakened against the pound (you need fewer pounds to buy a dollar now than you did). The dollar, in fact, is about 10% lower now than it was against the pound last May.
In turn, that means that $499, the iPad price in 2010 and 2011, equated in 2010 to £340.54, but is now £304.69. (In other words: it takes fewer pounds to get the $499 that Apple wants to get for each iPad sold.)
So it might seem like Apple is doing everyone an enormous favour by cutting the price (and it certainly won't hurt sales), but it is actually benefiting from the movement in exchange rates - in fact, it's going to make more profit from iPad sales this year than last year, even with a lower price.
A couple more interesting wrinkles to the iPad 2 launch internationally: sales won't start until 5pm in the evening of Friday, or 1am that day if you're ordering online. Why has it chosen such a time of day to do it? No word on that (we have called Apple but got no response), but there's the faintest possibility that it's to discourage the people who made the lives of would-be iPad buyers in the US hell - buying up loads of them in order to ship them off to the Far East. And another clue that that is the motive comes from the fact that sales in Hong Kong, Singapore and South Korea won't start for another two weeks, even while the other 25 countries (Australia, Austria, Belgium, Canada, Czech Republic, Denmark, Finland, France, Germany, Greece, Hungary, Iceland, Ireland, Italy, Luxembourg, Mexico, Netherlands, New Zealand, Norway, Poland, Portugal, Spain, Sweden, Switzerland and the UK) get theirs. (Though that won't really dissuade them - they'll just come back at the weekend, surely.)
The dollar/pound exchange rate since May 2010: the pound has sttrengthened since the launch of the iPad last year, which will help Apple's bottom line even as it cuts prices And just to add to the tablet fun, at CTIA Samsung has announced (or possible re-announced) its tablets and pricing. There will be the Galaxy Tab 10.1 (guess the screen size), to be released on 8 June - running Android 3.0 ("Honeycomb"). Prices: $499 (16GB), $599 (32GB). The Galaxy 8.9 will be priced at $469 (16GB), $499 (32GB), and be released in "early summer".So is this iPad competition? Well, Honeycomb is certainly nice, and that's price-competitive with the iPad, at least in the US. UK prices haven't been set (or suggested) and the release date is only "later this year". Samsung didn't want to share sales figures either: "those are only for internal use," we were told. (The press release and details haven't made it to Samsung's online press releases.)
The list of tablets that have been announced is thus growing ever longer, but the list of those actually seen in the wild in the UK remains extremely short - the iPad and the Samsung Galaxy Tab (and now @Dirkbruere's Advent Vega) being the principal ones. Anyone else got a tablet not in that list that they've bought in the UK this year? And what do you think of it?
Droid X and Droid 2 get unofficial Android Gingerbread 2.3

iiPad 2 vs. Android: And the winner is...
Well, folks, the wait is over: We finally have a fair fight. Since the launch of the Motorola Xoom and Google's Android Honeycomb OS, everyone's been champing at the bit to make iPad vs. Android tablet comparisons. Until now, though, the comparison had been putting a brand new device up against a year-old product -- Apple's original iPad -- and consequently didn't hold much weight.
With the revelation of Apple's new iPad 2 this week, that's all changed. So grab a front-row seat, battle fans, and let's get ready to rumble.
Apple's iPad 2 vs. Android Honeycomb Tablets: The Basics

We'll start by looking at the most significant changes in Apple's new iPad 2, as outlined by Steve Jobs himself at Wednesday'smagical special event. Cutting through the standard flowery-adjective-filled descriptions, the highlights are:
To boil it down to the basics, then, the new iPad is thinner, lighter, and faster than the old one, and it has cameras. That's pretty much it.
Pitted up against the Motorola Xoom -- the first and thus far only Android Honeycomb tablet on the market -- Apple's new iPad 2 comes out ahead in terms of thickness and weight: The Xoom is 0.16 of an inch thicker than the new iPad, and 0.25 of a pound heavier.
The iPad 2 is either equal to or somewhat behind the Xoom when it comes to raw processing power: Both the iPad 2 and the Xoom (as well as most of the other upcoming high-end Honeycomb tablets) have dual-core 1GHz processors. The Xoom has 1GB of RAM; rumors and recent reports suggest the iPad 2 has 512MB. Since Apple has not officially divulged that detail for the device, it's hard to say anything definitively.
Apple's iPad 2 vs. Android Honeycomb Tablets: The Smackdown

Okay -- so Apple's new tablet wins in size and weight and more or less catches up in speed and cameras. The Xoom, however, has the higher resolution display (10.1 inches at 1280-by-800 vs. 9.7 inches at 1024-by-768); support for expanded storage via MicroSD cards; and support for USB connections. It will also be upgradeable to 4G in the near future, while the iPad 2 is 3G forever.
Android's strongest advantages, though, come via the innovations found in the Honeycomb operating system -- innovations that will be present in all Android 3.0 tablets, not just the Xoom. Among the most noteworthy:
Apple's iPad 2 vs. Android Honeycomb Tablets: Apps and Other Considerations

All this application talk brings us to the current weak point of the Honeycomb tablet ecosystem: the number of tablet-optimized applications available for Android. That number, as Jobs pointed out during his presentation this week, is still small. It's no surprise: The tablet programming kit for Android app developers has been out for only roughly a week now. (You can run most regular Android apps on a Honeycomb tablet, by the way; what we're talking about here are programs created specifically to take advantage of the tablet's larger screen.)
So yes, the iPad does currently hold the advantage in selection of tablet-optimized apps -- but it won't be long before the field begins to level out. Remember, app numbers were a big argument by the Apple camp back when Android phones started gaining momentum in 2009. The growth in the Android Market since then has been staggering, and it continues to climb more with every passing month. Today, Android app development is flourishing. We've seen this story play out before.
There's also the issue of price: At $800 (unsubsidized), the Motorola Xoom is more expensive than Apple's lower-end iPad offerings. It's quite competitively priced, however, with the higher-end (and thus more comparable) iPad models. More important, while Motorola opted to offer only one model of the Xoom at launch, numerous Honeycomb tablet models will soon be available from multiple manufacturers. In addition to creating a far wider spectrum of prices, that'll present a far larger choice in size and form factor -- something Apple's single iPad can't offer.
Finally, let me say this: This comparison is looking at functionality and features; we're talking about what the products have to offer from a user perspective. No one's questioning the fact that Apple's iPad 2 will be a commercial success; hell, after having owned practically the entire tablet market for a full year, it'd be ridiculous if it weren't. Brand name recognition and interface familiarity go a long way, and Apple has mastered the art of making its products almost painfully simple to use. For some people, the iPad's utter simplicity and controlled uniformity are appealing qualities -- and that's fine.
 For users who want more robust features, choices, and customization potential, though, the Android Honeycomb tablets are light years ahead. And as Android's tablet-optimized app ecosystem continues to mature, that gap will only grow greater.
With the revelation of Apple's new iPad 2 this week, that's all changed. So grab a front-row seat, battle fans, and let's get ready to rumble.
Apple's iPad 2 vs. Android Honeycomb Tablets: The Basics
We'll start by looking at the most significant changes in Apple's new iPad 2, as outlined by Steve Jobs himself at Wednesday's
- The new iPad 2 is thinner and lighter than its predecessor; it's 0.34 inches thick and 1.3 pounds, compared to the previous iPad's 0.53-inch and 1.5-pound profile.
- The iPad 2 is faster than the first, boasting a dual-core 1GHz processor compared to the original's single-core 1GHz chip.
- Apple's latest iPad includes two cameras: a front-facing camera for video chat and a rear-facing camera for photo and 720p video capturing. It can also output HD video via an optional HDMI connector.
- The iPad 2 has a gyroscope.
To boil it down to the basics, then, the new iPad is thinner, lighter, and faster than the old one, and it has cameras. That's pretty much it.
Pitted up against the Motorola Xoom -- the first and thus far only Android Honeycomb tablet on the market -- Apple's new iPad 2 comes out ahead in terms of thickness and weight: The Xoom is 0.16 of an inch thicker than the new iPad, and 0.25 of a pound heavier.
The iPad 2 is either equal to or somewhat behind the Xoom when it comes to raw processing power: Both the iPad 2 and the Xoom (as well as most of the other upcoming high-end Honeycomb tablets) have dual-core 1GHz processors. The Xoom has 1GB of RAM; rumors and recent reports suggest the iPad 2 has 512MB. Since Apple has not officially divulged that detail for the device, it's hard to say anything definitively.
Apple's iPad 2 vs. Android Honeycomb Tablets: The Smackdown
Okay -- so Apple's new tablet wins in size and weight and more or less catches up in speed and cameras. The Xoom, however, has the higher resolution display (10.1 inches at 1280-by-800 vs. 9.7 inches at 1024-by-768); support for expanded storage via MicroSD cards; and support for USB connections. It will also be upgradeable to 4G in the near future, while the iPad 2 is 3G forever.
Android's strongest advantages, though, come via the innovations found in the Honeycomb operating system -- innovations that will be present in all Android 3.0 tablets, not just the Xoom. Among the most noteworthy:
- Widgets. Instead of being limited to simple rows of static icons filling up your tablet's home screens, as you are on an iPad, Honeycomb's widgets allow you to do things like view and actively scroll through your inbox, thumb through your upcoming calendar appointments, and flip through the latest news stories -- all without ever opening anything. To borrow a word from Apple's dictionary, this revolutionizes the tablet experience.
- Notifications. When you get an e-mail, an Android Honeycomb tablet briefly flashes the info at the bottom of your screen and then leaves an interactive icon for whenever you want to deal with it. You can customize notifications by service to control what you see and what you don't. It's intuitive and noninvasive, which certainly can't be said for the notification system on iOS and the iPad.
- Voice commands and translations. Thanks to Google's voice-to-text technology, Honeycomb tablets have fully integrated support for voice-based input. Anywhere you can type text, you can speak it. You can also use Google's Voice Actions system -- accessible via an icon on the home screen -- to perform advanced functions like conducting searches and making notes.
- Multitasking. While Apple has technically offered multitasking since iOS 4.0, it's multitasking with a major asterisk. Apple's form of multitasking is basically just task-switching and a limited amount of background processing. Android Honeycomb tablets, on the other hand, have full-fledged multitasking support. And using it is as easy as tapping an icon in the lower-left corner of the screen; that brings up a box with your most recently used programs, any of which can be opened from anywhere in the system.
- Desktop-like browsing. Honeycomb's browser is as close to the desktop experience as you can get on a tablet. The browser allows you to have multiple tabs, to open pages in "incognito" mode, and to automatically stay synced with your computer's Chrome installation. That means your bookmarks are always available and always up-to-date, wherever you go -- no PC connections or service subscriptions required.
And while the software is still a few weeks out, Honeycomb tablets will soon support browsing of Flash-based content. Mobile Flash loading is done on an on-demand basis, meaning you load material only when you want it (so no, you don't get bombarded with annoying ads). Love it or hate it, Flash is part of the Web -- and having a device that can't access it means you're left with blank holes while browsing.
- Full access to your files. You can plug an Android Honeycomb tablet into your computer and browse it as if it were a hard drive. You can drag and drop files from your PC at will -- no limitations, no proprietary software required. You can browse the file system directly from the device, too, making it easy to manage files, share materials, and do what you need to do. The iPad, in contrast, offers an extremely limited method of app-specific file transferring that can be done only through iTunes; you can't directly access or manage the tablet's file system in any way.
Think no iTunes is a negative? Think again. Instead of being forced to rely on a bloated program to manage your music, you can manage it any way you want with an Android tablet. Want to just drag and drop MP3 files without the hassle? No problem. Prefer a graphical interface? There's no shortage of options available. It's up to you; no company is forcing you to use some locked-down program just because they own it.
- The freedom to use your device the way you want. Beyond the aforementioned items, Android Honeycomb tablets are free from the Apple-enforced restrictions on how you can customize your device and what you can do with it. While Apple lets you install only programs it has approved -- and we all know how silly and arbitrary the company's app evaluation process can be -- Android devices let you install anything you want. Aside from Apple-banned things like porn and political satire, this includes numerous applications that let you customize your tablet in ways Apple would never allow. You can pick a replacement browser with extra features, for example, or change the way icons are displayed on your home screens. It's your tablet, and it's your choice.
As for those horrifying tales about the big, bad viruses just waiting to attack your vulnerable Android device? Let me ask you this: How many people do you know who have actually been infected? As I've said before, in any open environment, people are occasionally going to try some nasty stuff. That doesn't mean we lock down the Web and require every page and program to be preapproved. That means we take it upon ourselves to use some common sense and be careful about what we do online.
Apple's iPad 2 vs. Android Honeycomb Tablets: Apps and Other Considerations
All this application talk brings us to the current weak point of the Honeycomb tablet ecosystem: the number of tablet-optimized applications available for Android. That number, as Jobs pointed out during his presentation this week, is still small. It's no surprise: The tablet programming kit for Android app developers has been out for only roughly a week now. (You can run most regular Android apps on a Honeycomb tablet, by the way; what we're talking about here are programs created specifically to take advantage of the tablet's larger screen.)
So yes, the iPad does currently hold the advantage in selection of tablet-optimized apps -- but it won't be long before the field begins to level out. Remember, app numbers were a big argument by the Apple camp back when Android phones started gaining momentum in 2009. The growth in the Android Market since then has been staggering, and it continues to climb more with every passing month. Today, Android app development is flourishing. We've seen this story play out before.
There's also the issue of price: At $800 (unsubsidized), the Motorola Xoom is more expensive than Apple's lower-end iPad offerings. It's quite competitively priced, however, with the higher-end (and thus more comparable) iPad models. More important, while Motorola opted to offer only one model of the Xoom at launch, numerous Honeycomb tablet models will soon be available from multiple manufacturers. In addition to creating a far wider spectrum of prices, that'll present a far larger choice in size and form factor -- something Apple's single iPad can't offer.
Finally, let me say this: This comparison is looking at functionality and features; we're talking about what the products have to offer from a user perspective. No one's questioning the fact that Apple's iPad 2 will be a commercial success; hell, after having owned practically the entire tablet market for a full year, it'd be ridiculous if it weren't. Brand name recognition and interface familiarity go a long way, and Apple has mastered the art of making its products almost painfully simple to use. For some people, the iPad's utter simplicity and controlled uniformity are appealing qualities -- and that's fine.
For users who want more robust features, choices, and customization potential, though, the Android Honeycomb tablets are light years ahead. And as Android's tablet-optimized app ecosystem continues to mature, that gap will only grow greater. Tuesday, 29 March 2011
Comparing Features: iPad 2 vs. iPhone 4 vs. iPod touch
| iPad 2 | iPhone 4 | iPod touch | |
| capacity | 16GB, 32GB, 64GB | 16GB, 32GB | 8GB, 32GB, 64GB |
| screen size/ resolution | 9.7 inches/ 1024 x 768 | 3.5 inches/ 960 x 480 | 3.5 inches/ 960 x 480 |
| GPS | Yes (limited GPS on WiFi-only models) | Yes (Assisted GPS) | No |
| battery life (in hours) | 10 | up to 10 talk/ 10 Wifi/ 10 video/ 40 audio | up to 7 video/ 40 audio |
| networking | WiFi, 3G on some models | WiFi/3G/EDGE | WiFi |
| bluetooth | Yes | Yes | Yes |
| camera | 2 cameras, 720p HD recording and VGA | 2 cameras, 5 megapixel, still and 720p HD video | 2 cameras, with 720p recording |
| video editing app | Yes | Yes | Yes |
| video out to TV | Yes, 1080p HD | No | Yes |
| phone | No | Yes | No |
| size (in inches) | 9.5 x 7.31 x 0.34 | 4.51 x 2.31 x 0.37 | 4.4 x 2.3 x 0.28 |
| weight (in pounds) | 1.3 (1.34-1.35 on 3G models) | 0.3 | 0.22 |
| app store support | Yes | Yes | Yes |
| price | $499 - $829 | $199 - $299 | $229 - $399 |
| buying | compare prices at multiple stores | compare prices at multiple stores | compare prices at multiple stores |
Monday, 28 March 2011
20 Ways to Increase Laptop's Battery Life
 Mobile computing has got better with lighter components, better chips and faster processors. But the Achilles heel of a laptop has remained its battery. So here are we are going to look at ways to increase laptop battery life.
Modern graphic intensive operating systems and resource hungry applications are cutting down the life of your laptop’s battery every day. The average battery life per continuous use still stands at a maximum of three to four hours. So, a fast depleting battery could very swiftly put the crutches on your ‘mobile’ road trip.
Falling just short of carrying an extra pack of batteries in the back-pack, are several ways to keep the juice flowing through the batteries.
1. Ship shape with a defrag
Regular defragmentation helps to arrange data more efficiently thus making the hard drive work less to access the data. The quicker the moving hard drive works lesser is the load placed on the battery. Thus, your batter can last longer. The effect is minimal, but this efficiency goes hand in glove with hard drive maintenance.2. Kill the resource gobblers
End the background processes that are not vital. Monitor the resource usage through a “˜Ctrl-Alt-Del’ which brings up the Windows Task Manager (in Windows). If you’re not on the internet, it is safe to shut down the immediate non-essential programs running in the taskbar like the antivirus and the firewall. Weed out unnecessary programs running as start-ups by launching the System Configuration Utility from Run ““ Msconfig ““ Tab: Startup. Uncheck the programs which you don’t want to launch and reboot the computer once.3. Pause the scheduled tasks
It may be a defrag or a virus scan, but make sure it is scheduled for a time when you are near a power outlet. If not then nix them for the moment.4. Unplug external devices
USB devices are the biggest drainers of battery power. Unplug all external devices like an external mouse, PC cards, Wi-Fi, external speakers, Bluetooth and even an attached iPod.5. Empty the CD/DVD Drives
Even if you don’t intend to use it, don’t leave any CD/DVDs as leftovers in the drives. A spinning drive sucks battery power like a sponge.6. Go local
Desist using the DVD/external drives while running on batteries. Shift the content to the hard drive or run using (free) virtual drives like Pismo File Mount or even Microsoft’s Virtual CD ROM Control Panel.7. Lower the lights
The LCD screen of a laptop is another huge power sink. Calibrate the brightness to the lowest level you can tolerate using the Function key toggles or using the Display Settings applet in the Control Panel.8. Kill the sounds
Mute the speakers and try avoiding the use of multimedia software to maximize the battery life. Installed sound schemes also drain a battery perceptibly.9. Rid the screensaver
To maximize battery life by a little, switch off the screensaver.10. Visit Power Options
Get familiar with power management through the “˜Power Options’ applet in the Control Panel. Both XP and Vista come with advanced power management features which shut off components like the monitor and/or the hard drive after specified intervals. This again depends on the chosen “˜Power Schemes’ (for XP) in the same applet. For instance in XP, “˜Max Battery’ under Power Schemes can be selected for maximum battery optimization.

11. Turn off the looks
Today’s OS’s like Windows Vista come with features like “˜Aero Glass’ which are resource guzzlers. One can turn it off and go for the “˜Classic’ appearance which consumes less power. In Vista, click on Desktop – Preferences – View Colour – Appearance – Classic Appearance and Windows Basic graphical interface. In XP it’s – Display Properties – Theme – Windows Classic.Linux and even Macintosh are better optimized for longer battery life.
12. Hibernate is better than Sleep
In the Stand By mode (or sleep mode), the computer turns of the hard drive and the display but memory remains active while the CPU slows down. This draws on the battery. In contrast, hibernation mode is better because the computer saves the current state and shuts itself down completely thus saving power.13. Get the most…work on the least
Working on too many programs while on the battery is a sure fire power drainer. Keep use of graphic intensive applications to a minimum. Working on a spreadsheet consumes much less than playing your favourite game. To increase the life of the battery open just one or two programs concurrently.14. Ram in more RAM
Adequate RAM reduces the load on Virtual memory which by default resides on the hard drive. Though every extra bit of RAM uses up more power, it increases overall savings by short cutting access to the power hungry hard drive.15. Keep it clean
A laptop with blocked air vents will generate more heat thus reducing the life of the battery. Clean the air vents regularly to keep operating temperatures low. Allow for open space around the vents for air to circulate freely. Keep the area around the laptop clean to avoid entry of dust.16. Temperature is a silent killer
Undue heat kills off a battery slowly but surely. Avoid leaving the laptop under direct sunlight or inside a closed car.17. Avoid the memory effect
A problem more for the older Ni-MH batteries than for Li-Ion batteries on which most modern laptops run. Memory effect relates to the loss of battery charge when they are repeatedly recharged after being only partially discharged. It can be prevented by discharging the battery fully and then completely recharging it. Li-Ion batteries on the other hand have no problems with partial discharges and re-charges and complete discharge is never recommended for this type.18. Update software and drivers
This sounds a bit incongruous but then newer drivers and software are often designed to be more efficient (and hopefully less resource hungry).19. Use the right adapter
Ensure that the adapter you use to charge the laptop battery is an original one or one with the correct specifications. A mismatch in the wattage could cause an overload thus damaging the laptop and the battery.20. Pack it up
If you don’t plan to use the laptop on batteries for quite some time, ensure that the charge is nearly 40 percent – remove the batteries and store it in a cool place.A typical lithium ion battery has an overall average life of 2-3 years. With some care and caution, its mortality can be delayed.
Have you found your own way to increase battery life of your laptop? Share the “˜life giving’ tips with us in the comments.
How to build external battery for Laptop

Building your own external laptop battery pack is cheaper than buying a ready-made replacement.
Replacement laptop batteries can cost a third, if not more, of the price of a new laptop. Discounted prices constantly offered on new laptops often result in people choosing a new laptop instead of a replacement battery, even though the laptop is fine. Build an external laptop battery using lithium polymer (LiPo) batteries to save a lot of money and keep your existing laptop. Wire a few LiPo cells in series and your laptop will be ready to go.
- Difficulty:
- Moderately Easy
Instructions
things you'll need:
- LiPo batteries
- Electrical insulating tape
- Wire strippers
- Small knife
- AWG 16 wire
-
- 1 Check your laptop's required input voltage. It's on the base of your laptop clearly labeled. Most laptops operate on 19 volts, though it does vary.
- 2 Calculate the number of LiPo battery cells you need to power your laptop. One single LiPo cell produces 3.7 volts, so if your laptop operates on 19 volts, you need five LiPo cells wired in series. Wiring in series combines the output voltage from each cell. Don't build an external laptop battery pack that exceeds the input voltage for your laptop: the damage is irreparable.
- 3 Place your batteries on a suitable surface and lay them flat. LiPo batteries are similar in size to regular AA batteries, except they are shorter and fatter. The positive battery terminal is on the top and the negative on the bottom.
- 4 Alternate the terminals of each battery. For example, if you are using four batteries, have two positive and two negative terminals at each end. Label the batteries numerically, so, if you're using four batteries, label then 1 through 4. Wrap electrical insulating tape around the batteries to form a tight pack.
- 5 Cut strips of AWG 16 wire using a small knife. Cut two strips long enough to be able to reach your laptop and the external battery. The other strips need to be only an inch long so they can attach to the battery terminals. The numbers of short strips needed depends on the number of batteries you are using. The rule when you're wiring in parallel is to count the number of batteries and then deduct one. The result is the number of strips of wire you need.
- 6 Remove ¼-inch of plastic coating off the ends of each strip of wire using wire strippers or a small knife. Each wire has ¼-inch of metal wire exposed. Label the two long strips of wire "+" and "-."
- 7 Attach the wire labeled "+" to the positive terminal of Battery 1 and attach the wire labeled "-" to the negative terminal of the last numbered battery. Use a strip of electrical insulating tape.
- 8 Attach a short strip of wire to the negative terminal of Battery 1 and the other end to the positive terminal of Battery 2 using insulating tape. Repeat the process connecting a short wire to a negative terminal, then a positive terminal, for all the batteries in numerical sequence until you use the last short wire to connect to the positive terminal of the last numbered battery.
- 9 Wrap the complete battery pack neatly in insulating tape. Ensure you keep the two long wires exposed but the other wires and the battery terminals should be concealed.
- 10 Attach the wire labeled "+" to the positive input of your laptop and the wire labeled "-" to the negative input of your laptop. Your external laptop battery is set.
- 1
How to Build an External Notebook Battery

Notebook batteries average about 500 charges and discharges before they go dead. If you account for a full charge lasting between one and three hours, depending on the applications you are running, it's easy to see that your battery is likely to die before you need to replace your notebook. The problem is that replacement batteries can cost over one-third the price of a new notebook. However, building an external notebook battery using lithium polymer, or LiPo, batteries is a much cheaper alternative and can be done in a couple of hours.
- Difficulty:
- Challenging
Instructions
things you'll need:
- LiPo batteries
- Power jack
- Wire (AWG 16 gauge)
- Electrical insulating tape
- Small knife
- Wire strippers
- Soldering iron
- Solder
-
- 1 Look on the bottom of your notebook to find the input voltage requirement. It's likely to be in the range of 14.8 to 19 volts. The input voltage determines the number of LiPo batteries you need to build your external notebook battery pack. Each LiPo battery produces 3.7 volts so you need four or five batteries, depending on the voltage requirement, wired in series. Wiring in series combines the voltage from each battery so four LiPo batteries produce 14.8 volts and five 18.5 volts.
- 2 Put your LiPo batteries on a flat surface. LiPo batteries are similar in design and size as regular AA batteries. They have a positive terminal on the top and a negative terminal on the bottom. Alternate the battery terminals. Using four batteries you have positive, negative, positive, negative facing one way and negative, positive, negative, positive facing the other way.
- 3 Label the batteries numerically, either 1 through 4 or 1 through 5. Wrap the batteries in electrical insulating tape so you form a battery pack.
- 4 Cut strips of AWG 16 wire using a small knife. AWG 16 is suitable to carry the volts the battery pack produces. Cut two wire strips about 12 inches long so they can reach between your notebook and battery pack. The other wire strips need to be short: about 1 1/2 inches long, as they only need to connect between the battery terminals in the pack. The number of short strips depends on the number of batteries in your pack. A simple way to calculate the number of short strips is to count the number of batteries you are using, then deduct one. For example, if you're using four batteries in your pack, you need three short strips, and if you're using five batteries, you need four short strips.
- 5 Label the two long wires "+" and "-" respectively. Remove ¼ inch of plastic coating from the ends of every wire using wire strippers or a small knife to expose the copper wire.
- 6 Attach the long wire labeled "+" to the positive terminal of battery 1 and then attach the other long wire strip to the negative terminal of the last numbered battery in your pack. Use electrical insulating tape to attach them.
- 7 Attach a short wire strip to the negative terminal of battery 1 and the opposite end of the strip to the positive terminal of battery 2. Repeat attaching the short wire strips to the negative and then positive terminals of the remaining batteries in numerical order. The last short wire strip connects to the positive terminal of your last numbered battery.
- 8 Wrap the entire battery pack in electrical insulating tape. Make sure the two long wires extend from the pack, as you need to connect them to your notebook. The other short wires connecting the battery terminals need to be covered in tape.
- 9 Heat the soldering iron to operating temperature. Meanwhile remove the cover from your power jack. The power jack must be the same size as the power input socket on your notebook. Slide the cover over the two long wires.
- 10 Place the "+" labeled wire on the positive terminal of the power jack, then introduce the solder and soldering iron. Let a little solder melt so it coats the wire and terminal. Remove the soldering iron and let the solder cool, then fuse the wire and terminal together. Repeat the process using the "-" labeled wire attaching it to the negative terminal of the power jack. Allow the power jack to cool. Turn off the soldering iron.
- 11 Slide the power jack cover down the wires and screw onto the jack. Insert the jack into the corresponding input socket on your notebook. You have built an external notebook battery.
- 1
XP antivirus 2011
Instead of patronizing this potentially unwanted application, immediately run a full scan of the PC using a legitimate security product. Anti-malware application are known to combat rogue programs like XP Anti-virus 2011. On this page is our suggested removal tool that was tested to remove counterfeit applications. Download, install and update the database before running a full scan on the system. Remove all detected threats and if possible run a scan while the computer is in Safe Mode.
Screen Shot Image:

Damage Level: Medium
Systems Affected: Windows 9x, 2000, XP, Vista, Windows 7
XP Anti-Virus 2011 Removal Procedures
Manual Removal:1. Press Ctrl+Alt+Del on keyboard to stop process associated to “XP Anti-Virus 2011″. When Windows Task Manager opens, go to Processes Tab and find and end the following process:
(random characters).exe
2. You need to update your installed antivirus application to have the latest database.
3. Thoroughly scan the computer and any detected threats must be removed. If removal is prohibited, it is best to quarantine the infected item. Manually locating and deleting of malicious files should also be performed. Please see files below that are related to XP Anti-Virus 2011 Virus.
4. Registry entries created by XP Anti-Virus 2011 must also be remove from the Windows system. Please refer below for entries associated to the rogue program. [how to edit registry]
5. Exit registry editor.
6. Get rid of XP Anti-Virus 2011 start-up entry by going to Start > Run, type msconfig on the “Open” dialog box. A windows containing System Configuration Utility will be launched. Go to Startup tab and uncheck the following Start-up item(s):
(random characters).exe
7. Click Apply and restart the computer.
XP Anti-Virus 2011 Removal Tool:
In order to completely remove the threat from a computer, it is best to download and run Malwarebytes Anti-Malware. Sometimes, Trojans will block the downloading and installation of MBAM. If this happens, download it from a clean computer and rename the executable file before executing on the infected computer.
Using Portable SuperAntiSpyware:
To thoroughly clean a computer, it is best to do a separate scan of another security program so that other infected files not detected by anti-virus application can be remove as well. Download and run SuperAntiSpyware Portable Scanner.
Technical Details and Additional Information:
If XP Anti-Virus 2011 is installed on the computer, it will begin to display fake alerts as an scare tactics to mislead victims:XP Anti-virus 2011 Firewall AlertMalicious Files Added by XP Anti-Virus 2011:
XP Anti-virus 2011 has blocked a program from accessing the internet
Internet Explorer is infected with Trojan-BNK.Win32.Keylogger.gen
Private data can be stolen by third parties, including credit card details and passwords.
%AllUsersProfile%\[random]
%AppData%\[random]
%UserProfile%\Local Settings\Application Data\.exe
%UserProfile%\Templates\[random]
%Temp%\[random]
XP Anti-Virus 2011 Registry Entries:
HKEY_CLASSES_ROOT\.exe\shell\open\command “(Default)” = ‘”%UserProfile%\Local Settings\Application Data\<random 3 letters>.exe” /START “%1″ %*’
HKEY_CLASSES_ROOT\.exe\shell\open\command “IsolatedCommand” = ‘”%1″ %*’
HKEY_CLASSES_ROOT\.exe\shell\runas\command “(Default)” = ‘”%1″ %*’
HKEY_CLASSES_ROOT\.exe\shell\runas\command “IsolatedCommand” = ‘”%1″ %*’
HKEY_CLASSES_ROOT\exefile “Content Type” = ‘application/x-msdownload’
HKEY_CLASSES_ROOT\exefile\shell\open\command “IsolatedCommand” = ‘”%1″ %*’
HKEY_CLASSES_ROOT\exefile\shell\runas\command “IsolatedCommand” = ‘”%1″ %*’
HKEY_CLASSES_ROOT\exefile\shell\open\command “(Default)” = ‘”%UserProfile%\Local Settings\Application Data\<random 3 letters>.exe” /START “%1″ %*’
HKEY_LOCAL_MACHINE\SOFTWARE\Clients\StartMenuInternet\FIREFOX.EXE\shell\open\command “(Default)” = ‘”%UserProfile%\Local Settings\Application Data\<random 3 letters>.exe” /START “C:\Program Files\Mozilla Firefox\firefox.exe”‘
HKEY_LOCAL_MACHINE\SOFTWARE\Clients\StartMenuInternet\FIREFOX.EXE\shell\safemode\command “(Default)” = ‘”%UserProfile%\Local Settings\Application Data\<random 3 letters>.exe” /START “C:\Program Files\Mozilla Firefox\firefox.exe” -safe-mode’
HKEY_LOCAL_MACHINE\SOFTWARE\Clients\StartMenuInternet\IEXPLORE.EXE\shell\open\command “(Default)” = ‘”%UserProfile%\Local Settings\Application Data\<random 3 letters>.exe” /START “C:\Program Files\Internet Explorer\iexplore.exe”‘
HKEY_CURRENT_USER\Software\Classes\.exe “(Default)” = ‘exefile’
HKEY_CURRENT_USER\Software\Classes\.exe “Content Type” = ‘application/x-msdownload’
HKEY_CURRENT_USER\Software\Classes\.exe\DefaultIcon “(Default)” = ‘%1′ = ‘”%UserProfile%\Local Settings\Application Data\<random 3 letters>.exe” /START “%1″ %*’
HKEY_CURRENT_USER\Software\Classes\.exe\shell\open\command “IsolatedCommand” = ‘”%1″ %*’
HKEY_CURRENT_USER\Software\Classes\.exe\shell\runas\command “(Default)” = ‘”%1″ %*’
HKEY_CURRENT_USER\Software\Classes\.exe\shell\runas\command “IsolatedCommand” = ‘”%1″ %*’
HKEY_CURRENT_USER\Software\Classes\exefile “(Default)” = ‘Application’
HKEY_CURRENT_USER\Software\Classes\exefile “Content Type” = ‘application/x-msdownload’
HKEY_CURRENT_USER\Software\Classes\exefile\DefaultIcon “(Default)” = ‘%1′
HKEY_CURRENT_USER\Software\Classes\exefile\shell\open\command “(Default)” = ‘”%UserProfile%\Local Settings\Application Data\<random 3 letters>.exe” /START “%1″ %*’
HKEY_CURRENT_USER\Software\Classes\exefile\shell\open\command “IsolatedCommand” = ‘”%1″ %*’
HKEY_CURRENT_USER\Software\Classes\exefile\shell\runas\command “(Default)” = ‘”%1″ %*’
HKEY_CURRENT_USER\Software\Classes\exefile\shell\runas\command “IsolatedCommand” – ‘”%1″ %*’
HKEY_CLASSES_ROOT\.exe\DefaultIcon “(Default)” = ‘%1′
Unlock IPhone 5 : Impossible?
A recent report shades some light on the future of the next-gen iPhone, maybe even the upcoming iPhone 5. Apple is now getting ready to include in future smartphones its own custom SIM that means Cupertino is thinking about avoiding any carrier hassles when it comes to iPhone sales, but it also can deal with future iPhone unlocking problems.

Apple is said to work closely with Gemalto to make the special SIM card that would be pre-loaded on future handsets. That would make the future iPhone purchase a lot easier than before as iPhone customers will basically get a working handset right out of the box without having to worry about activating it immediately with a carrier. Apple would include an “app for that” and the iPhone owner would be able to select the carrier he or she wants to use from within the app.
That would render carriers almost useless when it comes to selling the device as customers would be able to go directly to Apple and order the device. But since the carrier is not as involved anymore, does that mean we won’t have subsidized iPhone offers in the future? Will Apple sell the device at full-price, which is an expensive alternative for most iPhone fans? The whole custom SIM card story is just a rumor for now and we’re waiting for either Apple or Gemalto to confirm any of this.
This unconfirmed plan seems to have been put in motion specifically for Europe, a region where there are lots of iPhone carriers already selling various iPhone models and where most exclusivity deals have already expired. Such an iPhone selling method would definitely be in Apple’s advantage, but I don’t think carriers will give up on making cash off Apple’s iPhone and some sort of subsidized deals will still be in order.
But since it’s likely carriers will find a way to offer iPhone deals and special 2-year contracts, does that mean the smartphone will not be as easily unlocked as it currently is? Sure changing carriers seems to be a lot easier to do through an Apple and Gemalto SIM management application, but if you happen to be locked in a contract with carrier X, then could you use the device on any other local network before your contract expires?
Would the custom SIM card use be mandatory? Would it be user-replaceable with usual micro SIM cards? Will we see this design and functionality changes adopted by the iPhone 5 or is this a plan for the distant future of the iPhone? It’s too early to answer all these questions but we’ll keep tabs on this particular Apple magical endeavor and come back with more news for you.
IPad 2 vs Galaxy Tab 10.1 vs Galaxy Tab 8.9

A couple of weeks ago, Samsung’s CEO said that he feels the Galaxy Tab 10.1 felt “inadequate” to the newly released iPad 2 and that some changes needed to take place, one of which was the pricing. I can only say bravo to Samsung for making such radical of a changes in such a short period of time. They actually managed to make the new Tabs even thinner than the iPad 2, measuring at just 8.6mm thickness.
And here comes a head-to-head comparison of the two new Samsung slates and the Apple iPad 2 on some of their most important features.
Google Wave
The service seems to combine Gmail and Google Docs into an interesting free-form workspace that could be used to write documents collaboratively, plan events, play games or discuss a recent news.

Google Wave has been designed by the founders of Where 2 Tech, a start-up acquired by Google to create a cutting-edge mapping service, which later became Google Maps.
"Back in early 2004, Google took an interest in a tiny mapping startup called Where 2 Tech, founded by my brother Jens and me. We were excited to join Google and help create what would become Google Maps. But we also started thinking about what might come next for us after maps. As always, Jens came up with the answer: communication. He pointed out that two of the most spectacular successes in digital communication, email and instant messaging, were originally designed in the '60s to imitate analog formats — email mimicked snail mail, and IM mimicked phone calls. Since then, so many different forms of communication had been invented — blogs, wikis, collaborative documents, etc. — and computers and networks had dramatically improved. So Jens proposed a new communications model that presumed all these advances as a starting point; I was immediately sold," explains Lars Rasmussen.
"In Google Wave you create a wave and add people to it. Everyone on your wave can use richly formatted text, photos, gadgets, and even feeds from other sources on the web. They can insert a reply or edit the wave directly. It's concurrent rich-text editing, where you see on your screen nearly instantly what your fellow collaborators are typing in your wave. That means Google Wave is just as well suited for quick messages as for persistent content -- it allows for both collaboration and communication. You can also use "playback" to rewind the wave to see how it evolved."
You can see some screenshots of the service and find some details about the API that could be used to extend the service and the Wave protocol that allows anyone to run a "wave" server. Google promises that Google Wave will be available later this year.
Sunday, 27 March 2011
Using Facebook Helpers on your Website
Adding social media to websites is very popular these days. Businesses use it to increase their presence on the web while individuals use it to keep people up to date. Whatever your reasons, this tutorial will show you how to seamlessly integrate several of the Facebook Social Plugins into your website, quickly and easily. In this tutorial we will be using a free tool from Microsoft called WebMatrix. WebMatrix allows you to create, customize and publish websites. It’s amazingly easy to use, and can be downloaded from www.microsoft.com/web/webmatrix.
In this tutorial, we will be looking at 2 different ways to add facebook plugins to a website, using the facebook developer’s plugin and using the WebMatrix Facebook helper. One feature that WebMatrix offers is Helpers. Helpers are previously written code that allows us to integrate the code into our webpage with few lines of code. Helpers are nice because they are a timesaver, can be easily added, and allow you to reuse code over and over.
Open WebMatrix. Select ‘Site from Template’ on the WebMatrix welcome screen.

Select “Starter Site”, give the site a name, and hit “OK.”

Open your files workspace by clicking on “Files” on the lower left hand of your screen.

You now have a basic starter site with two pages, default and about. Select the “Default.cshtml” file on the left and run it.

The beauty of WebMatrix’s templates is the ease of which they can be customized. For this tutorial, we will not be customizing our site but merely adding the Facebook plugin to our site.
There are numerous options of plugins that are available to add to our website. Some common plugins include activity feeds, comments, and like buttons.
The nice thing about the plugins from Facebook is the fact that the code is generated for you. All you have to do is copy and paste it into your website.
Visit the Facebook plugin site at developers.facebook.com/plugins.

For this example we will use the “Like button.” Click on the “Like Button” link.

This page gives background on the like button, instructions on how to implement it in your page and the configurator that supplies your code.
In the configurator, add the URL of your website and change the style features to match your preference. The current look of our like button can be seen on the right.

Once done configuring the like button code, get the “Get Code” button. This will cause a pop up box to appear with the code you must copy and paste into your website.

Here you have two options of code: iframe or XFBML (which uses JavaScript). We will be using the iframe code. Copy the code before you click “Okay” and close the pop up box.
Open your Default.cshtml file. You may notice that our page only contains a little bit of Razor code and an html <p> tag. Because our Starter Site uses a site layout page, we only need to add the code that can be seen in the body of the page.
Add the code you copied from Facebook, either before or after the <p> tag.
In this tutorial, we will be looking at 2 different ways to add facebook plugins to a website, using the facebook developer’s plugin and using the WebMatrix Facebook helper. One feature that WebMatrix offers is Helpers. Helpers are previously written code that allows us to integrate the code into our webpage with few lines of code. Helpers are nice because they are a timesaver, can be easily added, and allow you to reuse code over and over.
Create a Website with WebMatrix
WebMatrix gives you a number of different ways that you can create a new web site. You can use an existing open source application such as WordPress, Joomla, DotNetNuke or Umbraco, or you can create a site yourself by either coding everything or by using a small, simple template. For this tutorial, we will be using a simple site template.Open WebMatrix. Select ‘Site from Template’ on the WebMatrix welcome screen.
Select “Starter Site”, give the site a name, and hit “OK.”
Open your files workspace by clicking on “Files” on the lower left hand of your screen.
You now have a basic starter site with two pages, default and about. Select the “Default.cshtml” file on the left and run it.
The beauty of WebMatrix’s templates is the ease of which they can be customized. For this tutorial, we will not be customizing our site but merely adding the Facebook plugin to our site.
Getting our Facebook Plugin code
One of the ways to add Facebook plugins to our site is by using the Facebook plugins available from the Facebook website. These plugins can be found at developers.facebook.com/plugins.There are numerous options of plugins that are available to add to our website. Some common plugins include activity feeds, comments, and like buttons.
The nice thing about the plugins from Facebook is the fact that the code is generated for you. All you have to do is copy and paste it into your website.
Visit the Facebook plugin site at developers.facebook.com/plugins.
For this example we will use the “Like button.” Click on the “Like Button” link.
This page gives background on the like button, instructions on how to implement it in your page and the configurator that supplies your code.
In the configurator, add the URL of your website and change the style features to match your preference. The current look of our like button can be seen on the right.
Once done configuring the like button code, get the “Get Code” button. This will cause a pop up box to appear with the code you must copy and paste into your website.
Here you have two options of code: iframe or XFBML (which uses JavaScript). We will be using the iframe code. Copy the code before you click “Okay” and close the pop up box.
Adding our Like Button code to our webpage.
Now, let’s get back to our webpage in WebMatrix.Open your Default.cshtml file. You may notice that our page only contains a little bit of Razor code and an html <p> tag. Because our Starter Site uses a site layout page, we only need to add the code that can be seen in the body of the page.
Add the code you copied from Facebook, either before or after the <p> tag.
<iframe src="http://www.facebook.com/plugins/like.php?href=http%3A%2F%2Fwww.asp.net&layout=box_count&show_faces=true&width=450&action=like&font=verdana&colorscheme=light&height=65" scrolling="no" frameborder="0" style="border:none; overflow:hidden; width:450px; height:65px;" allowTransparency="true"></iframe>
Run your Default file. Our like button is now visible on our page.

Adding a like button was pretty simple but it required us to go to the Facebook developer page and get our code. Using the WebMatrix Facebook Helper, we can simply add our Like button with one line of code. Let’s do that now.
WebMatrix offers a Facebook helper that you can easily install and use on your site. With this helper, we can easily add the Facebook Like button to all of our webpages on our site. But before we can use our Helper, we must install it.
In WebMatrix, run your Default.cshtml file.
Replace the Default.cshtml in your URL with _Admin
Change: http://localhost:15400/Default.cshtml
To: http://localhost:15400/_Admin
Note: your localhost will be different than this.
You will be prompted to create a password.
Once you create a password you will be prompted to log in.

Once you are logged in, you will see all the packages available for you to install. We need to install the Facebook.Helper 1.0 package.

Click Install. Once the Facebook Helper is installed, the button will now say “Uninstall.”
Plugins that do not require Initialization:
Open your Default.cshtml file. Replace your previous Facebook like button code:

Now, if we wanted our like button to appear on every page we can easily make this happen. Open your _SiteLayout.cshtml file. This file defines the layout of our website. Adding our helper on this page will make it appear on every page.
Locate:
We can also define parameters to change the style of our Like Button. There are numerous parameters we could define (these can be found in our Facebook.cshtml file in our App_Code folder).
Run our Default.cshtml file. Notice our button looks a little different now that we’ve configured our button.

With the WebMatrix Facebook Helper, you can easily add any of the Facebook Social Plugins with a few lines of code.

Before we can add our helper we must first register our application with Facebook, retrieve our App Id and App Secret, and then initialize this in our website.
Name your application, agree to the Facebook terms and click the “Create Application” button

You will now need to add your site URL and domain name. Supplying our localhost for the Site URL is perfectly okay. This URL can be found in the browser when you run your file or under your Site Workspace.

Keep track of your Application ID and Application Secret that is on this page. You will need these later when we initialize our helper.
We now need to get our Initialization scripts. We can do this on our _SiteLayout page so our whole site is initialized. Open your _SiteLayout.cshtml.
Locate your <html> tag and add
Locate:
Note: Since we added our comments to our _SiteLayout.cshtml file, our comment box will appear on all webpages on our site. If you want the comments to only appear on one page, you simply have to move our @Facebook.Comments() helper to the page where you wish it to be.
Adding a like button was pretty simple but it required us to go to the Facebook developer page and get our code. Using the WebMatrix Facebook Helper, we can simply add our Like button with one line of code. Let’s do that now.
Installing the Facebook Helper
Although Facebook book provides documentation, including the possible attributes that you can specify, using a WebMatrix Facebook helper has some advantages. For example, what if you wanted to include the “Like button” to all of your webpages on your website? This would require you to go through each page, copying and pasting the Like button code we got from the Facebook Developers website. This is redundant and also allows room for error. Also, if you wanted to change part of the code already on your site, you would have to go through the code and change it in each place where it appears.WebMatrix offers a Facebook helper that you can easily install and use on your site. With this helper, we can easily add the Facebook Like button to all of our webpages on our site. But before we can use our Helper, we must install it.
In WebMatrix, run your Default.cshtml file.
Replace the Default.cshtml in your URL with _Admin
Change: http://localhost:15400/Default.cshtml
To: http://localhost:15400/_Admin
Note: your localhost will be different than this.
You will be prompted to create a password.
Once you create a password you will be prompted to log in.
Once you are logged in, you will see all the packages available for you to install. We need to install the Facebook.Helper 1.0 package.
Click Install. Once the Facebook Helper is installed, the button will now say “Uninstall.”
Using the Facebook Helper
Some of the Facebook Plugins require an initialization while others do not. Initialization is not difficult but does require use to add a few extra steps when using our Facebook Helper.Plugins that do not require Initialization:
- Like Button
- Activity Feed
- Recommendations
- Like Box
- Login button
- Face Pile
- Comments
- Live Stream
Open your Default.cshtml file. Replace your previous Facebook like button code:
<iframe src="http://www.facebook.com/plugins/like.php?href=http%3A%2F%2Fwww.microsoft.com&layout=box_count&show_faces=true&width=450&action=like&font=verdana&colorscheme=light&height=65" scrolling="no" frameborder="0" style="border:none; overflow:hidden; width:450px; height:65px;" allowTransparency="true"></iframe>With:
@Facebook.LikeButton();Run your file. Notice, your facebook like button is still on your page. Note: if may look different because the Facebook Helper used the default Like button style.
Now, if we wanted our like button to appear on every page we can easily make this happen. Open your _SiteLayout.cshtml file. This file defines the layout of our website. Adding our helper on this page will make it appear on every page.
Locate:
<div id="content">Somewhere before the closing <div> add our helper:
@Facebook.LikeButton();Run your Default.cshtml file. Notice, your page looks the same as before.
We can also define parameters to change the style of our Like Button. There are numerous parameters we could define (these can be found in our Facebook.cshtml file in our App_Code folder).
string href = "",
string buttonLayout = "standard",
bool showFaces = true,
int width = 450,
int height = 80,
string action = "like",
string font = "",
string colorScheme = "light",
string refLabel = ""
In our _SiteLayout.cshtml, find our @Facebook.LikeButton(); Change your code to the following:
@Facebook.LikeButton(
     href: "http://www.microsoft.com",
     buttonLayout: "button_count",
     font: "Verdana",
     colorScheme: "dark"
)
Now we have defined what URL people can like by clicking the button (this is usually the URL of our site), the button layout, the font and the color scheme. You may notice these parameters are the same as what we could configure on the Facebook site. Run our Default.cshtml file. Notice our button looks a little different now that we’ve configured our button.
With the WebMatrix Facebook Helper, you can easily add any of the Facebook Social Plugins with a few lines of code.
Adding a Plugin that Requires Initialization
Using plugins that require initialization requires us to do a couple more steps than before. A great guide on getting started with the Facebook helper comes with the package in the starthere.htm file. It can be found under the Facebook folder.Before we can add our helper we must first register our application with Facebook, retrieve our App Id and App Secret, and then initialize this in our website.
Getting our Application ID and Application Secret from Facebook
Go to www.facebook.com/developers/createapp.php to create our App ID and App Secret.Name your application, agree to the Facebook terms and click the “Create Application” button
You will now need to add your site URL and domain name. Supplying our localhost for the Site URL is perfectly okay. This URL can be found in the browser when you run your file or under your Site Workspace.
Keep track of your Application ID and Application Secret that is on this page. You will need these later when we initialize our helper.
Initializing our Helper
Go back to our WebMatrix page. Open _AppStart.cshtml (or create a file with this name if you do not have one already). We need to add our initialization with our Application ID and Application Secret. In _AppStart.cshtml, add:@{
Facebook.Initialize("<your App ID>", "<your App Secret>");
}Make sure you replace the parameters with your App ID and App Secret we previously got from Facebook.We now need to get our Initialization scripts. We can do this on our _SiteLayout page so our whole site is initialized. Open your _SiteLayout.cshtml.
Locate your <html> tag and add
@Facebook.FbmlNamespaces()Before the closing >, like so:
<html lang="en" @Facebook.FbmlNamespaces() >We will now add our Facebook plugin. For this example, we will use the Comments plugin. In our _SiteLayout.cshtml file,
Locate:
@RenderBody()Directly after, add:
@Facebook.GetInitializationScripts()
@Facebook.Comments()
Run your file.
Note: Since we added our comments to our _SiteLayout.cshtml file, our comment box will appear on all webpages on our site. If you want the comments to only appear on one page, you simply have to move our @Facebook.Comments() helper to the page where you wish it to be.
Saturday, 26 March 2011
Web Matrix : Any one can Develop Websites

Learn More about WebMatrix
Windows Live Essentials 2011 brings good, bad in equal measure

The final version of Windows Live Essentials 2011 is now available to download. The all-in-one bundle of mail client, instant messenger, movie editor, blog editor, and more, runs on Windows Vista and Windows 7—Windows XP users need not apply.
We've already had a detailed look at Messenger and Live Mesh (which at the time was called Live Sync). The positives are much the same now as they were then; Messenger's social integration works well, its Facebook chat is useful, and its tabbed chats extremely welcome, if overdue.
Unfortunately, criticisms leveled at those products in the beta are just as valid in the final version.
Messenger has lost widely-used features like one-way webcam chats, the ability to hide that you have a webcam installed (especially popular among teenagers and children, who might want to use their camera but don't want to advertise that they have one), and the ability to have nicknames. Microsoft claims that the webcam features were ditched as part of the development of HD video calling. I don't doubt that HD video calling works, but I don't have the hardware to use it; nor does anyone on my contact list (though Microsoft's HD webcam does look appealing). As such, it seems a bitter pill to swallow. The distaste is exacerbated by the fact that the new video calling appears to place considerably greater demands on my processor than the old webcam feature, enough to cause noticeable slow-downs.
The loss of nicknames is a result of the social integration. Facebook and LinkedIn, in particular, use real names; the abandonment of nicknames and use of real names within Messenger is a reflection of this. It's a move that has been unpopular with many long-time Messenger users; the ability to create "screen names" is a long-standing feature of instant messaging, and its removal, especially for those not interested in social networking features, is felt to be something of a privacy violation.
The system can be subverted easily enough, of course; there's nothing to compel the use of an accurate and honest first name/last name pair.
Live Mesh is still a confused and confusing mix of peer-to-peer sync, cloud sync, and remote desktop access. Though the cloud storage, now 5GB, is branded "SkyDrive," it still doesn't integrate with the "real" 25GB SkyDrive service. Since that SkyDrive underpins new features like large Hotmail photo galleries and photo integration with Windows Live Photo Gallery, this is disappointing. Perhaps we must wait for Essentials 2012.
Windows Live Photo Gallery has a range of desirable new features. Face recognition and geotagging are both welcome additions (although the geotagging is broken). Also useful is a tool named "Photo Fuse," that can take the best parts of several pictures to construct a composite—to allow creation of group photos where everyone has their eyes open, say. With the 30,000 photos I have in my collection, it is a little sluggish, however, which detracts somewhat from the experience.
 I was also disappointed to see that the Bing Bar remains an apparently mandatory part of the Windows Live Essentials install process. The Bing Bar may be useful. Honestly, I don't know. Because what I do know is this: it doesn't look right (it doesn't fit in with the styling of Internet Explorer 8, and looks even more out of the place in the Internet Explorer 9 beta), and it makes my browser awfully slow. So slow, in fact, that Internet Explorer 9 warns me about it:
 Internet Explorer 9 may be in beta, but it offers the diagnostic tools; why couldn't whoever wrote the Bing Bar use them and discover that there is a problem with its performance?
Update: Ah, it turns out that the Bing Bar isn't mandatory after all, it just doesn't get uninstalled with the rest of the suite. When I removed the beta to install the final version, it didn't remove the Bing Bar. If the installer finds the Bing Bar is already installed, it gives no choice but to upgrade it. If, however, it's not installed at all, it is optional as it should be.
The aim of the Windows Live Essentials is to provide value to Windows in a manner that's both decoupled from the operating systems' release schedule, and unlikely to receive antitrust attention. They certainly do that. Not everyone will use every tool (I've never used Movie Maker or Family Safety, for example), but it will be a rare person indeed for whom the suite offers nothing of value. Though some decisions are maddening, the 2011 version is certainly an upgrade on last year's offering.
We've already had a detailed look at Messenger and Live Mesh (which at the time was called Live Sync). The positives are much the same now as they were then; Messenger's social integration works well, its Facebook chat is useful, and its tabbed chats extremely welcome, if overdue.
Unfortunately, criticisms leveled at those products in the beta are just as valid in the final version.
Messenger has lost widely-used features like one-way webcam chats, the ability to hide that you have a webcam installed (especially popular among teenagers and children, who might want to use their camera but don't want to advertise that they have one), and the ability to have nicknames. Microsoft claims that the webcam features were ditched as part of the development of HD video calling. I don't doubt that HD video calling works, but I don't have the hardware to use it; nor does anyone on my contact list (though Microsoft's HD webcam does look appealing). As such, it seems a bitter pill to swallow. The distaste is exacerbated by the fact that the new video calling appears to place considerably greater demands on my processor than the old webcam feature, enough to cause noticeable slow-downs.
The loss of nicknames is a result of the social integration. Facebook and LinkedIn, in particular, use real names; the abandonment of nicknames and use of real names within Messenger is a reflection of this. It's a move that has been unpopular with many long-time Messenger users; the ability to create "screen names" is a long-standing feature of instant messaging, and its removal, especially for those not interested in social networking features, is felt to be something of a privacy violation.
The system can be subverted easily enough, of course; there's nothing to compel the use of an accurate and honest first name/last name pair.
Live Mesh is still a confused and confusing mix of peer-to-peer sync, cloud sync, and remote desktop access. Though the cloud storage, now 5GB, is branded "SkyDrive," it still doesn't integrate with the "real" 25GB SkyDrive service. Since that SkyDrive underpins new features like large Hotmail photo galleries and photo integration with Windows Live Photo Gallery, this is disappointing. Perhaps we must wait for Essentials 2012.
Windows Live Photo Gallery has a range of desirable new features. Face recognition and geotagging are both welcome additions (although the geotagging is broken). Also useful is a tool named "Photo Fuse," that can take the best parts of several pictures to construct a composite—to allow creation of group photos where everyone has their eyes open, say. With the 30,000 photos I have in my collection, it is a little sluggish, however, which detracts somewhat from the experience.
Photo Fuse is ideal for those annoying group photos
Dear right hand, please meet left hand
Update: Ah, it turns out that the Bing Bar isn't mandatory after all, it just doesn't get uninstalled with the rest of the suite. When I removed the beta to install the final version, it didn't remove the Bing Bar. If the installer finds the Bing Bar is already installed, it gives no choice but to upgrade it. If, however, it's not installed at all, it is optional as it should be.
The aim of the Windows Live Essentials is to provide value to Windows in a manner that's both decoupled from the operating systems' release schedule, and unlikely to receive antitrust attention. They certainly do that. Not everyone will use every tool (I've never used Movie Maker or Family Safety, for example), but it will be a rare person indeed for whom the suite offers nothing of value. Though some decisions are maddening, the 2011 version is certainly an upgrade on last year's offering.
Clojure : Programming Language
Clojure is a dialect of Lisp, and shares with Lisp the code-as-data philosophy and a powerful macro system. Clojure is predominantly a functional programming language, and features a rich set of immutable, persistent data structures. When mutable state is needed, Clojure offers a software transactional memory system and reactive Agent system that ensure clean, correct, multithreaded designs.
I hope you find Clojure's combination of facilities elegant, powerful, practical and fun to use.
Friday, 25 March 2011
PHP as part of .Net framwork
Phalanger makes PHP first-class citizen in the .NET languages family. It gives PHP programmers the ability to benefit from both the ease-of-use and effectiveness of the PHP language and the power and richness of the .NET platform taking profit from the best from both sides.
I have to admit, I’m a big fan of .NET and Anders Hejlsberg, the lead architect of the team developing C#. That’s right, I said it! I’m a fan of .NET! Anders created an excellent programming language, which has a procedural, object-oriented syntax based on C++ and includes influences from aspects of several other programming languages, most notably Delphi and Java. C# and PHP have a lot in common, they are both simple, modern, object-oriented programming languages. In fact, a lot of C# programmers are familiar with PHP, and vice versa.
What is Phalanger?
Phalanger is a new PHP implementation introducing the PHP language into the family of compiled .NET languages. It provides PHP applications an execution environment that is fast and extremely compatible with the vast array of existing PHP code. Phalanger compiles PHP scripts into MSIL (Microsoft Intermediate Language) which can be executed by .NET or Mono runtime. This runtime executes MSIL code using JIT (Just-In-Time) compilation, which makes the execution far more effective than interpretation and significantly improves application speed.
Thanks to the Visual Studio 2008 Shell provided by Microsoft, you can now get Visual Studio with Phalanger for free.
Phalanger Features
- Compiles PHP language to the MSIL (Microsoft Intermediate Language), which is a byte-code assembly used by the .NET CLR
- Compiles PHP scripts directly to the .NET/Mono assemblies
- Phalanger makes it possible to use any .NET object in PHP applications
- Allows using .NET objects from the PHP language thanks to the PHP/CLR Language Extensions
- Enables using libraries written in PHP from other .NET languages
- Allows using .NET generics including writing and extending generic objects in the PHP language
- Allows writing objects fully compatible with .NET languages (like C#) in the pure mode
- Thanks to Phalanger you can use PHP for developing presentation layer on top of bussines logic written in C#
Subscribe to:
Posts (Atom)